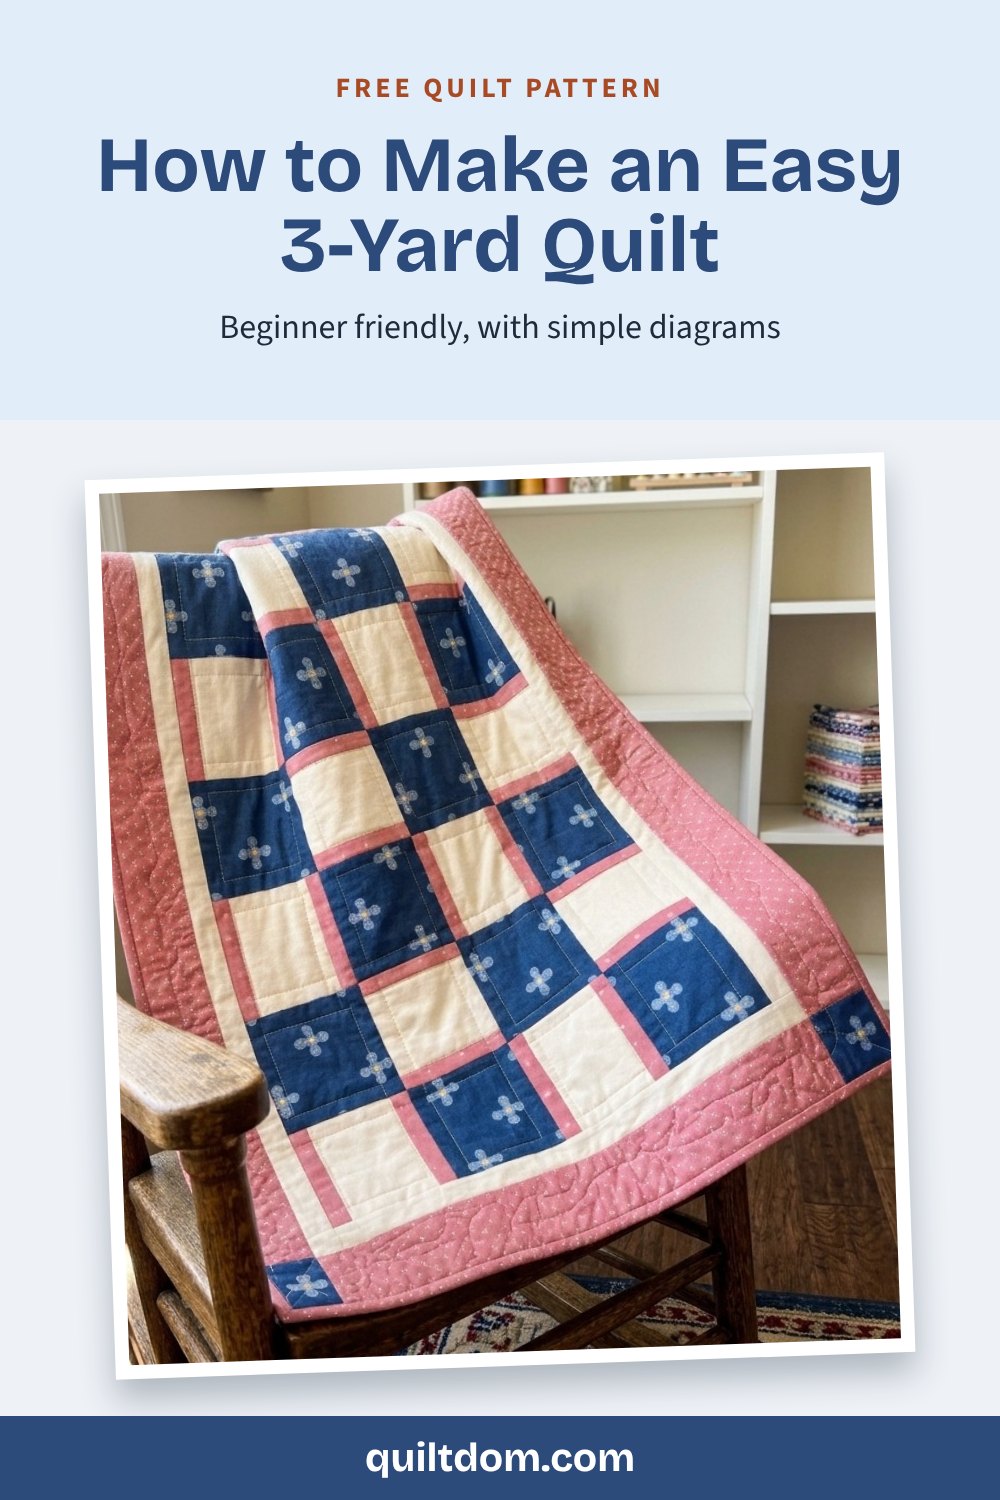
Three fabrics. Three yards. One finished quilt top.
That's the magic of a 3-yard quilt. You don't need a big fabric bundle or a stash full of scraps. Just pick three fabrics you love, and you can have a quilt top done in a weekend.
Our free Window Box pattern is made for beginners. It uses big squares that show off a favorite print, quick strip-pieced blocks and straight seams from start to finish. We'll walk you through every step with diagrams, including exactly how to cut each yard so nothing goes to waste.
What’s In This Post:
- Window Box Quilt at a Glance
- Step 1: Choose Your Three Fabrics
- What You'll Need
- Step 2: Cut Your Fabric
- Step 3: Sew the Strip Sets
- Step 4: Cut the Rail Blocks
- Step 5: Lay Out and Sew the Quilt Center
- Step 6: Add the Borders
- Step 7: Quilt and Bind
- Make It Your Own
- Tips for a Perfect 3-Yard Quilt
- 3-Yard Quilt FAQs
Window Box Quilt at a Glance
| Finished size | 47" x 65" (throw) |
| Block size | 9" finished (9 ½" unfinished) |
| Fabric for the top | Three 1-yard cuts |
| Skill level | Beginner |
| Techniques | Strip piecing, straight seams, simple borders |
The quilt is made from just two blocks: a plain square of your focus fabric and a "rail" block made from strips. The rail blocks turn sideways every other row, so the quilt looks like rows of little windows trimmed in color.
Step 1: Choose Your Three Fabrics
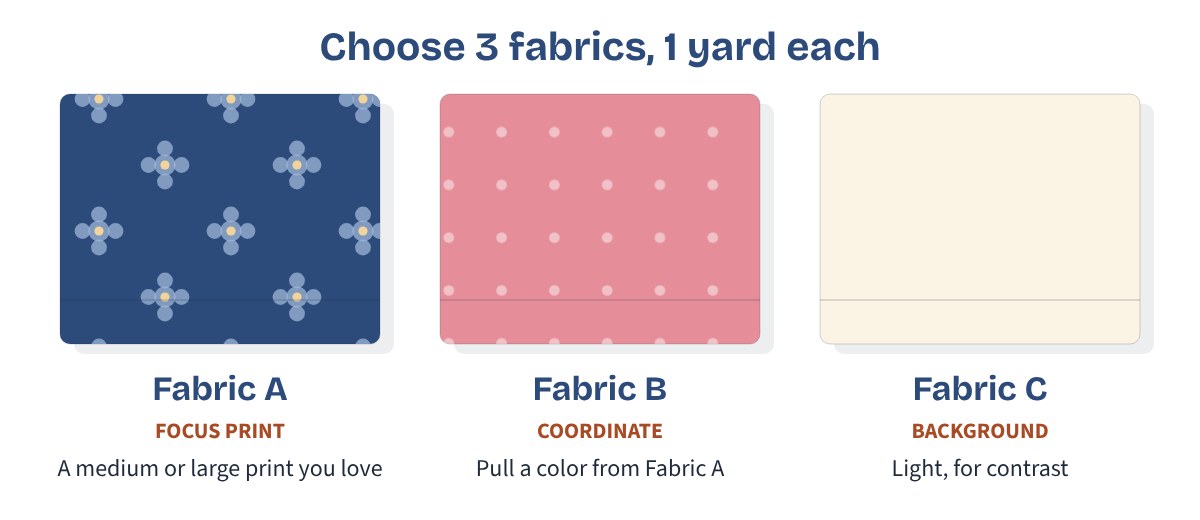
Each fabric has its own job in this quilt:
- Fabric A (focus print): this fabric becomes the twelve big squares, so choose a medium or large print you love. Florals, novelty prints and holiday prints all work well.
- Fabric B (coordinate): this fabric trims each window and makes the outer border. Pick a color that appears in Fabric A. A small print, tone-on-tone or solid works best.
- Fabric C (background): this is the light center of each window and the inner border. Choose something clearly lighter than A and B.
Check your contrast. Lay the three fabrics side by side, take a photo and switch it to black and white. You should see a dark, a medium and a light. If two of them look like the same gray, swap one out.
Directional prints are fine for Fabric A. The A squares never turn, so a print with a clear "up" will stay upright. Just keep the squares facing the same way when you lay out your quilt.
What You'll Need
For the quilt top:
- 1 yard Fabric A (focus print)
- 1 yard Fabric B (coordinate)
- 1 yard Fabric C (background)
To finish the quilt:
- 3 ¼ yards of 42" wide backing fabric
- Batting at least 55" x 73" (a twin-size package works)
- ½ yard binding fabric (or use leftover Fabric B or C if you have enough)
Tools:
- Rotary cutter and a self-healing cutting mat
- A long quilting ruler (24" is ideal for cutting strips)
- Sewing machine, neutral thread, pins or clips, and an iron
Step 2: Cut Your Fabric
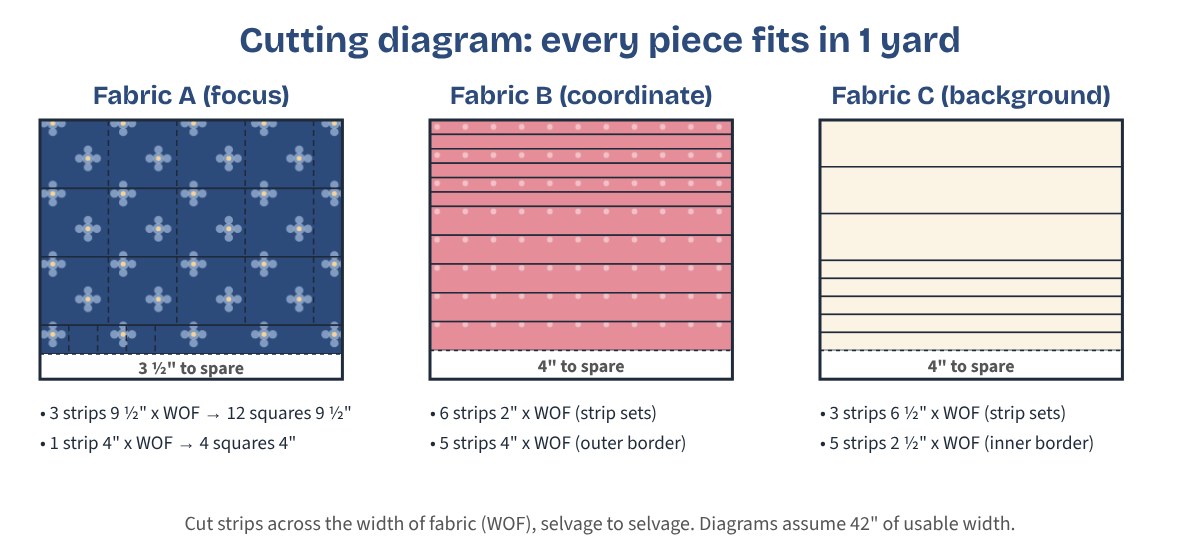
All strips are cut across the width of fabric (WOF), from selvage to selvage. The cutting plan needs at least 40" of usable width after you trim the selvages. Most quilting cottons have about 42".
| Fabric | Cut | Then subcut | Used for |
|---|---|---|---|
| A | 3 strips, 9 ½" x WOF | 12 squares, 9 ½" | Focus squares |
| A | 1 strip, 4" x WOF | 4 squares, 4" | Border corners |
| B | 6 strips, 2" x WOF | none | Strip sets |
| B | 5 strips, 4" x WOF | none | Outer border |
| C | 3 strips, 6 ½" x WOF | none | Strip sets |
| C | 5 strips, 2 ½" x WOF | none | Inner border |
Each fabric has about 3 ½" to 4" left over, so you have a little room if your cuts are slightly off.
Tip: If you prewash your fabric, measure the length afterward. Cotton can shrink an inch or two, which is one more reason to cut carefully and start with a straight edge.
Step 3: Sew the Strip Sets
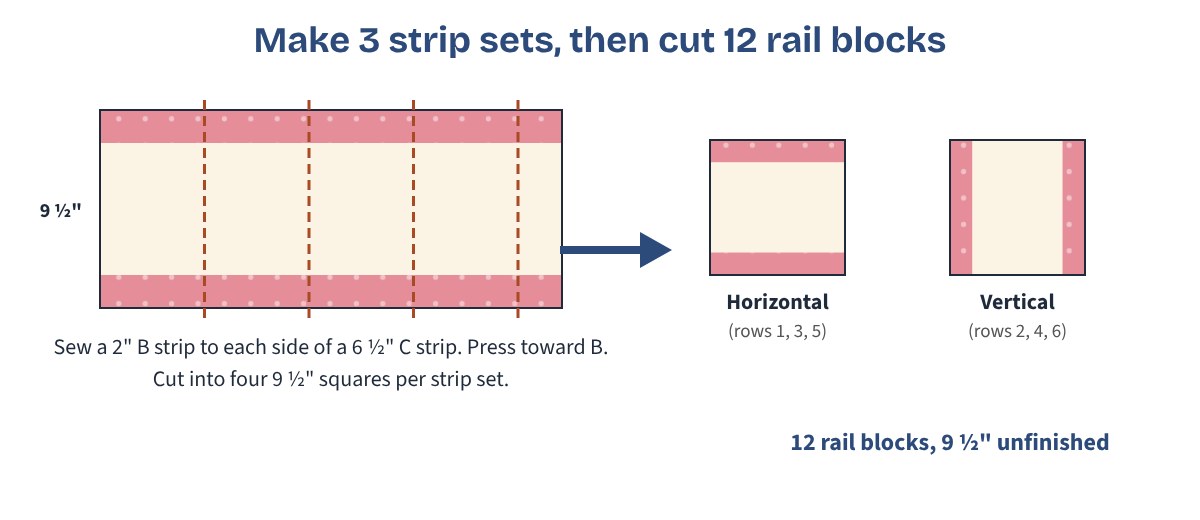
- Sew a 2" Fabric B strip to each long side of a 6 ½" Fabric C strip, right sides together, using a ¼" seam.
- Press the seams toward Fabric B.
- Measure the strip set. It should be 9 ½" tall. If it's a little off, check your seam allowance before you sew the next one.
- Make 3 strip sets.
Tip: Sew the second B strip starting from the opposite end of the set. Alternating directions keeps long strip sets from curving.
Step 4: Cut the Rail Blocks
- Trim one short end of each strip set so it's straight and square.
- Cut four 9 ½" squares from each strip set.
- You'll have 12 rail blocks in all, each 9 ½" square.
Step 5: Lay Out and Sew the Quilt Center
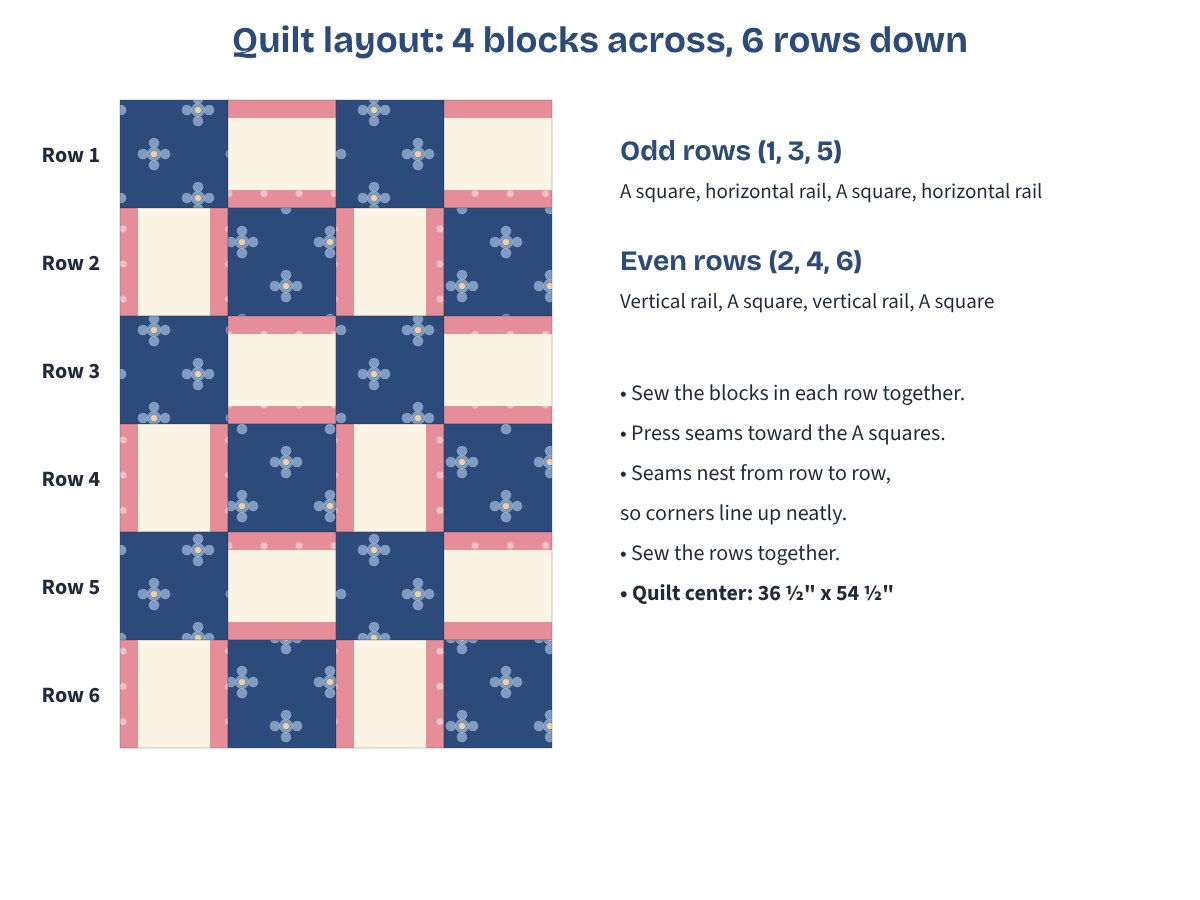
Lay out your blocks in 6 rows of 4 blocks, alternating the focus squares and rail blocks like a checkerboard.
- Rows 1, 3 and 5: A square, horizontal rail, A square, horizontal rail
- Rows 2, 4 and 6: vertical rail, A square, vertical rail, A square
The rails turn every other row, which creates the window look. Take a photo of your layout before you start sewing so you can check it later.
- Sew the 4 blocks in each row together.
- Press the seams toward the A squares. Because the A squares shift position from row to row, the seams will press in opposite directions and nest neatly when you join the rows.
- Sew the rows together in order, matching the seams. Press the long seams in one direction.
Your quilt center should measure 36 ½" x 54 ½".
Step 6: Add the Borders
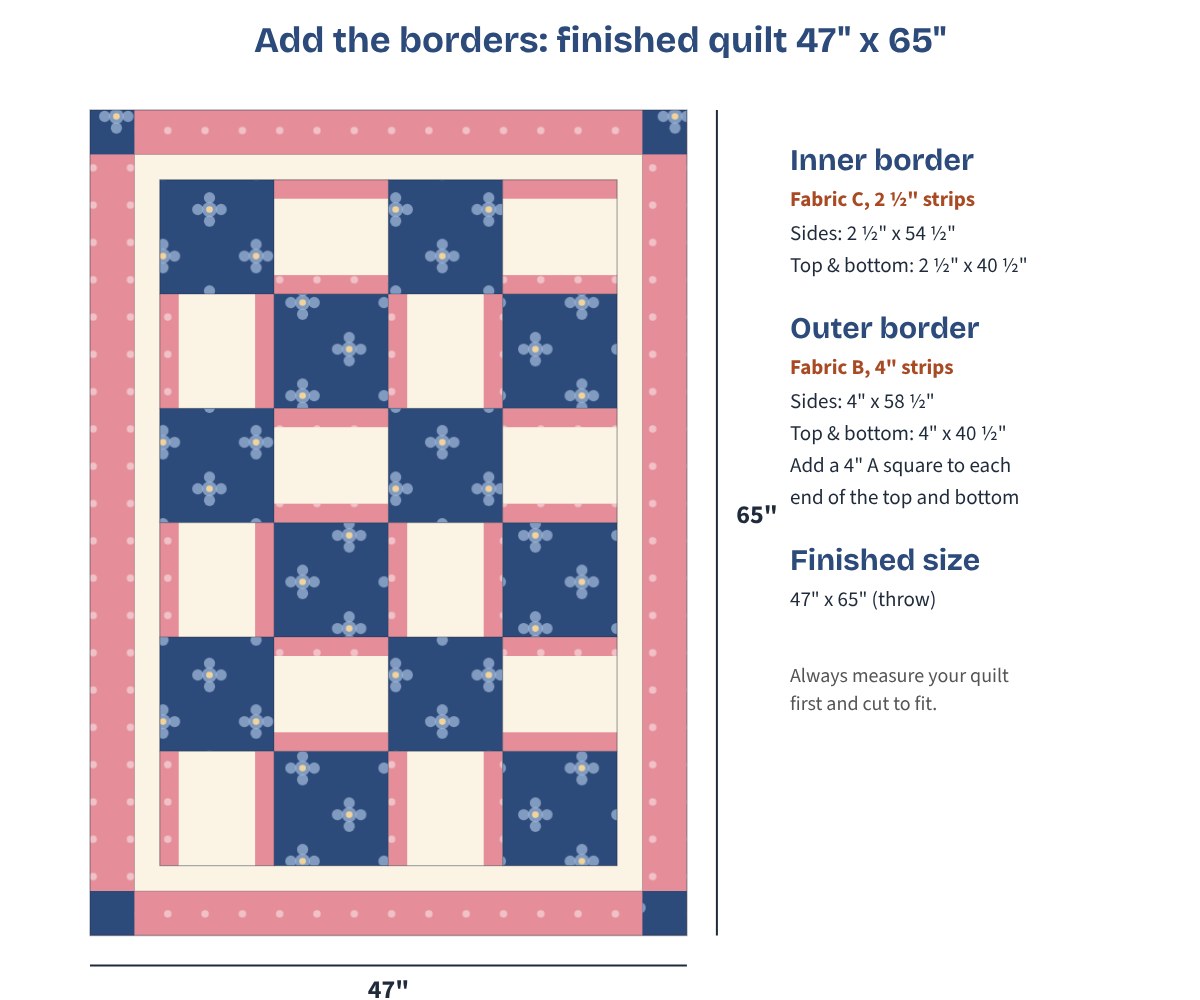
Always measure your quilt through the center before cutting border strips. The measurements below are what you should get with an accurate ¼" seam.
Inner border (Fabric C):
- Sew the five 2 ½" Fabric C strips together end to end to make one long strip.
- Cut 2 side borders, 2 ½" x 54 ½". Sew them to the sides of the quilt and press toward the border.
- Cut 2 top and bottom borders, 2 ½" x 40 ½". Sew them on and press toward the border.
Outer border (Fabric B with Fabric A corners):
- Sew the five 4" Fabric B strips together end to end.
- Cut 2 side borders, 4" x 58 ½". Sew them to the sides and press toward the outer border.
- Cut 2 top and bottom borders, 4" x 40 ½". Sew a 4" Fabric A square to each end of both strips, so they measure 4" x 47 ½".
- Sew the top and bottom borders on, matching the corner squares to the side border seams. Press toward the outer border.
Your finished quilt top measures 47 ½" x 65 ½" and will finish at 47" x 65" after binding. Want wider borders? Our quilt border calculator shows how much fabric you'll need.
Step 7: Quilt and Bind
- Make the backing. Cut the 3 ¼ yards of backing fabric into two equal pieces (about 58" each). Trim off the selvages and sew the pieces together along the long edges. Press the seam open. Your backing should be at least 55" x 73". Our quilt backing calculator can double-check your numbers.
- Make the quilt sandwich. Layer the backing (wrong side up), batting and quilt top (right side up). Smooth out any wrinkles and baste with pins or basting spray.
- Quilt as desired. Straight lines are perfect for this pattern. Try stitching ¼" from each seam with a walking foot, or quilt a diagonal grid through the A squares.
- Bind the quilt. Cut six 2 ½" strips from your binding fabric and follow our step-by-step guide to binding a quilt.
Not sure which batting to use? See our guide to choosing quilt batting.
Make It Your Own
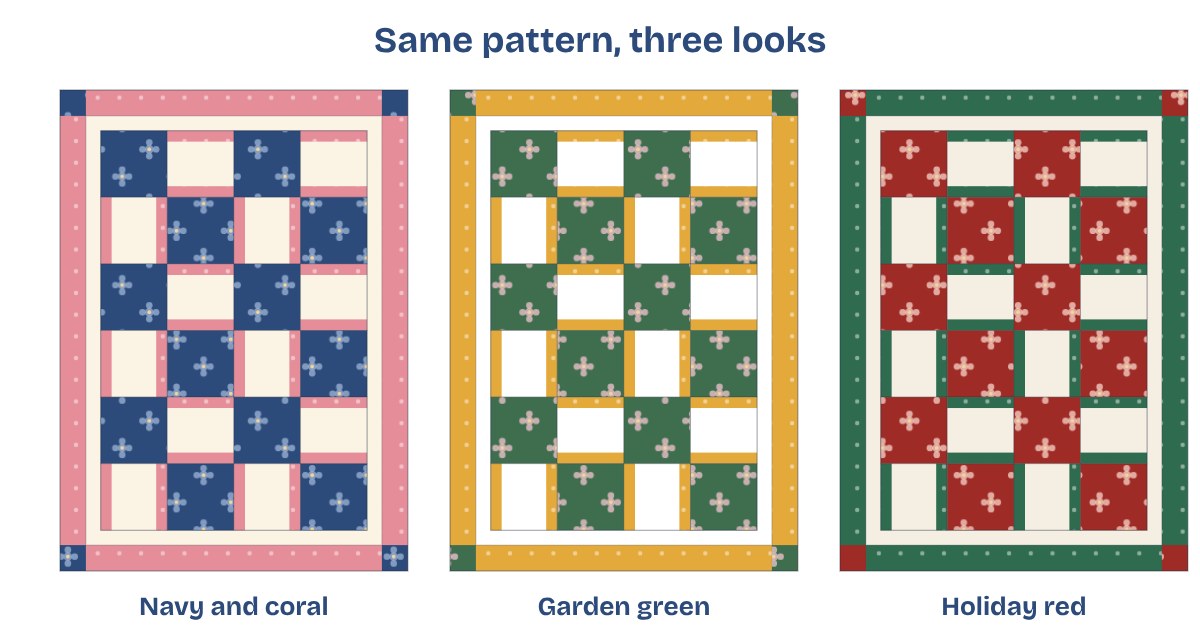
The same three-fabric pattern looks completely different depending on your fabrics:
- Navy and coral: a bold floral with a cheerful pink trim.
- Garden green: a botanical print with golden yellow and crisp white.
- Holiday red: a Christmas print with green trim for a quick seasonal throw.
You can also try a novelty print for a kid's quilt, a solid Fabric A for a modern look, or a reproduction print for a vintage feel.
Tips for a Perfect 3-Yard Quilt
- Test your ¼" seam. Sew three 2" strips together. The center strip should measure exactly 1 ½" wide. If not, adjust your needle or seam guide.
- Press, don't iron. Lift and lower the iron instead of sliding it, especially on strip sets, so they don't stretch.
- Use spray starch. A little starch before cutting keeps strips crisp and accurate.
- Square up as you go. Trim each rail block to exactly 9 ½" if needed. Accurate blocks make the rows go together easily.
- Label your fabrics. Pin a little A, B or C tag to each stack so you don't mix them up.
3-Yard Quilt FAQs
How long does it take to make this quilt?
Most quilters can cut and sew this quilt top in a weekend. Strip piecing makes the rail blocks fast, and there are only 24 blocks to join.
How wide does my fabric need to be?
The plan needs at least 40" of usable width. The blocks only need 38", but the border strips are joined end to end, and they need the extra length. Measure after trimming the selvages. If your fabric is narrower, cut a sixth 2 ½" strip from Fabric C (it still fits in the yard) and buy an extra ¼ yard of Fabric B for a sixth outer border strip.
Is the binding included in the 3 yards?
No. The three yards make the quilt top. You'll need ½ yard for binding, plus backing and batting.
Can I make this quilt bigger?
Yes. The easiest way is to add a wider outer border. You can also add more rows of blocks, but you'll need extra fabric. Check our quilt sizes chart to choose your target size first.
Where can I find more 3-yard patterns?
We've rounded up our favorites in 14 Fun and Easy 3-Yard Quilt Patterns. Once you've made this one, you'll be ready for any of them.