
Quilt labels are one of those small and personalized details that you may not find on most handmade quilts.
This small addition to your quilts will give all the necessary information to whoever looks at your quilt, whether it’s six months after you made it or 60 years.
In this post, I’ll show you how to use our free printable labels with your projects, plus give you several methods to create your own labels.
I’ve also created a Free Printable Quilt Labels PDF that you can download to help you out with labeling your quilts.
What Are Quilt Labels and Why Do You Need Them?
Quilt labels are often a small piece of fabric, most commonly a square or rectangle, made from 100% quilting cotton.
The information required for the label is then either written, ironed on, or printed onto that fabric with fabric-safe ink.
You’ll want to use a white or very light color for the tag or label to ensure the wording is easily visible for the recipient. The wording should be written or printed using a dark color (black or navy blue, etc.).
How many times have you heard someone say, “Well, I have a quilt someone in my family made years ago, but I’m not sure who made it, when they made it, or why?”
Adding a quilt label onto the back of your quilts provides that vital info to the person you are giving a quilt to and their future family. Quilt tags can also add a sweet personal touch to gifts you give to friends and family.
Now let’s take a look at how you can use our quilt label template to make your very own labels for your quilts.
How to Use (or Apply) Our Free Printable Quilt Labels
I created five different designs to choose from. They will all look great — whether you print them in full color or black and white.
These instructions cover how to print quilt labels onto iron-on fabric transfer paper. I will be using Avery Light Fabric Transfers.
Step 1: Download the PDF.
First, you will need to download the PDF. To download our Free Quilt Labels PDF, click here.
For the labels with areas to fill in the information, you can either write the info by hand or download the PDF and edit it on your computer using a PDF editing program such as Adobe Acrobat or Mac Preview.
Step 2: Print the PDF.
Once you have downloaded the PDF successfully and made any changes you would like to make, go ahead and print out the quilt labels. Since we are using an iron-on transfer paper, you will want to flip the images to mirror the actual design.
To do this, click “File” and then “Print.” Depending on your computer and operating system, you may have the option to “flip horizontally” like the image below or need to go into printing properties or advanced settings.

The wording may vary, but it will say something to the effect of flip, reflect, or mirror image. I suggest printing a practice sheet on regular printing paper to make sure you figure it out. I print my practice sheet in black and white to save the color ink.
When you’re confident you have the image mirrored, print out your labels onto one of the fabric transfer sheets.

Step 3: Iron the design onto the label fabric.
Cut out the quilt label design you want to use for your project. Leave about ¼” space around the design to be sure when you peel the paper off the label that it won’t peel off the design.
Now cut your fabric piece that will be your label. Leave a ¼” seam allowance if you choose to turn the corners under when attaching the label to your quilt.
Center your transfer paper on the fabric you’ll be ironing it onto. Follow the instructions given on the packaging of your fabric transfer paper.

Tip: Most iron-on transfer paper companies recommend NOT using an ironing board. The reason is that ironing boards are quite soft, and the design may not transfer evenly.
They suggest using a hard surface such as Formica or another heat-resistant surface with a pillowcase or other cloth between the surface and your project.
I use a small folding wooden table and a t-shirt for small ironing tasks like this one. (You know, the little foldable tables your parents or grandparents had for TV dinners.) They’re inexpensive, store well, and work great for this type of project.
If you use a t-shirt, be sure NOT to iron where it has a graphic design on it. The iron could melt the design and ruin your t-shirt.

Step 4: Attach label onto quilt project.
Attach your label to your project as desired. You could turn under the edges and stitch a straight line around the edge, or you could zig-zag stitch the entire edge and give it an embroidered look.
I zig-zag stitched the edges with this example because I like the “badge” look of this label. I also filled in the information for the quilt label with a fabric marker.

3 More Quilt Label Ideas
I don’t know about you, but I love to have several different options when deciding how to do pretty much every step in my quilt making. Quilt labels are not the exception, so I’ve found three other ways you can create unique labels for your quilting projects.
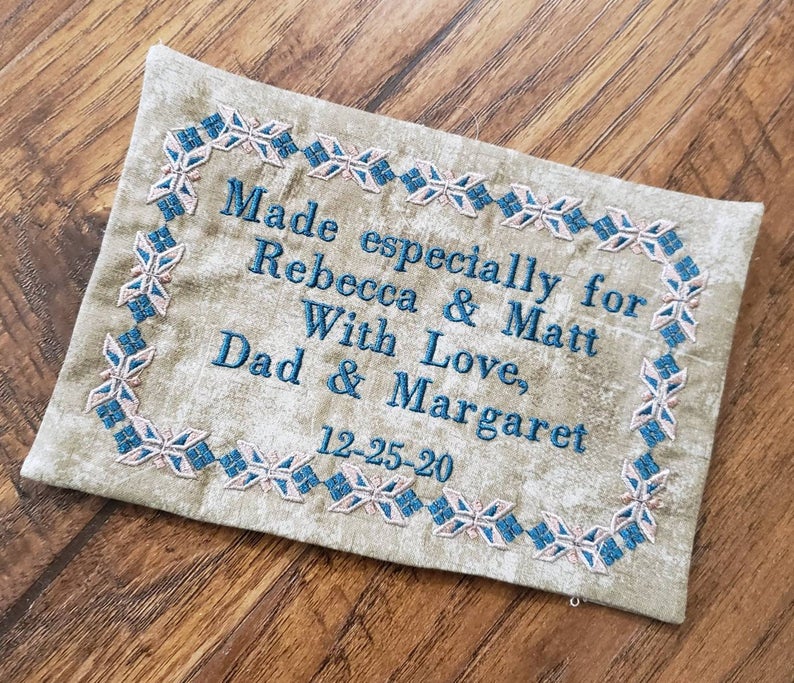
Idea #1: Hand or Machine Embroidery
If you have an embroidery machine, you can easily create your quilt labels with the different fonts and designs available on your machine.
On the other hand, if you love to do hand embroidery, you could create a beautiful personal note on your quilt labels and attach the label by hand.
Idea #2: Freezer Paper Method
This idea is similar to the method I showed earlier, but instead of using transfer paper, you use freezer paper. Follow these simple steps to print directly onto fabric:
- Cut out an 8 ½”x11” piece from freezer paper and a light shade of fabric (this will be the fabric you will be printing on).
- Take your 2- 8 ½”x11” pieces and iron them together. Place the wrong side of the fabric onto the waxy side of the freezer paper and iron with low heat. They will fuse together quickly (about 5 seconds).
- Place your fabric/freezer paper piece into your printer like you would regular paper. Make sure the paper is put into the printer so the printer will print the design onto the fabric, not the freezer paper.
- Print the design onto the fabric. You do not need to do the extra step of printing the design with the image mirrored or flipped since you are printing directly onto the fabric itself.
- Peel off the freezer paper (it will peel easily), cut out your label, and attach to your project as desired.

Idea #3: Hand draw the entire quilt label design.
If you can draw beautiful designs by hand, why not carry that skill over to your quilt labels? You can do a beautiful decorative border and write out your labels. I love this idea because it emphasizes the personal touch and handmade charm of a quilt.

Personalize Your Next Project with a Quilt Label
Quilt labels are a fun and easy way to add just another layer of charm and sweetness to a quilt while also including information that should go along with any quilt you create for someone special.
Future generations will love that you took the time to give those unique details on the quilt label, and it will be a unique way for them to feel connected to their past and, more importantly, to you.