
A quilter’s frame may not be a necessary tool for every quilter, but if you plan to do a lot of hand quilting, it may be a good idea to invest in a quilt frame.
Sure, you can find pre-made frames online, but let’s be honest, most of us quilters like to do as many DIY projects as possible.
Why not make your own quilting frame?
In this post, I give you simple instructions on how to make a quilt frame by using either wood or PVC — and the pros and cons of both types.
How Does a Quilting Frame Work?
If you have never seen someone use a quilting frame, it is quite an interesting tool.
Basically, it holds your quilt layers taut, either with slots that hold the quilt edges or with some sort of clamp.
Using a quilting frame then ensures that the fabric won’t pucker or have any creases while you are hand quilting your beautiful piece of art.
Some quilting frames are large enough that they will hold your entire quilt taut at one time. Others are smaller and will hold just a section at a time while the rest of the quilt drapes around the frame.
Quilting Frame Plans for a Wood and PVC Frame
Now that we know how a quilt frame works, let’s review the quilt frame instructions for both wood and PVC frames.
If you’re wondering how to build a quilting frame but worry it’s too hard, these simple instructions are just what you need. You can tweak them to create the size frame you would like to make.
How To Make A Wood Quilt Frame
This frame plan can accommodate a small baby quilt up to a queen size quilt if you want the entire quilt in the frame at one time. You could also do a king-size quilt, but you will just need to create it in sections.
Supplies You Will Need:
- Six 8ft 1”x3” pine boards (1”x3”x8’): When picking out your boards, be sure to pick the most perfect boards you can find. You don’t want any knots or warping of the boards.
- One sheet of plywood or particleboard (chipboard)
- Miter saw or table saw
- Jigsaw
- Sandpaper
- Four Clamps
Steps to Create a Wooden Quilt Frame:
- Cut two of the 1”x3”x8’ boards into eight 1”x3”x16” pieces with the miter saw. These will be the feet for the four legs you will construct.
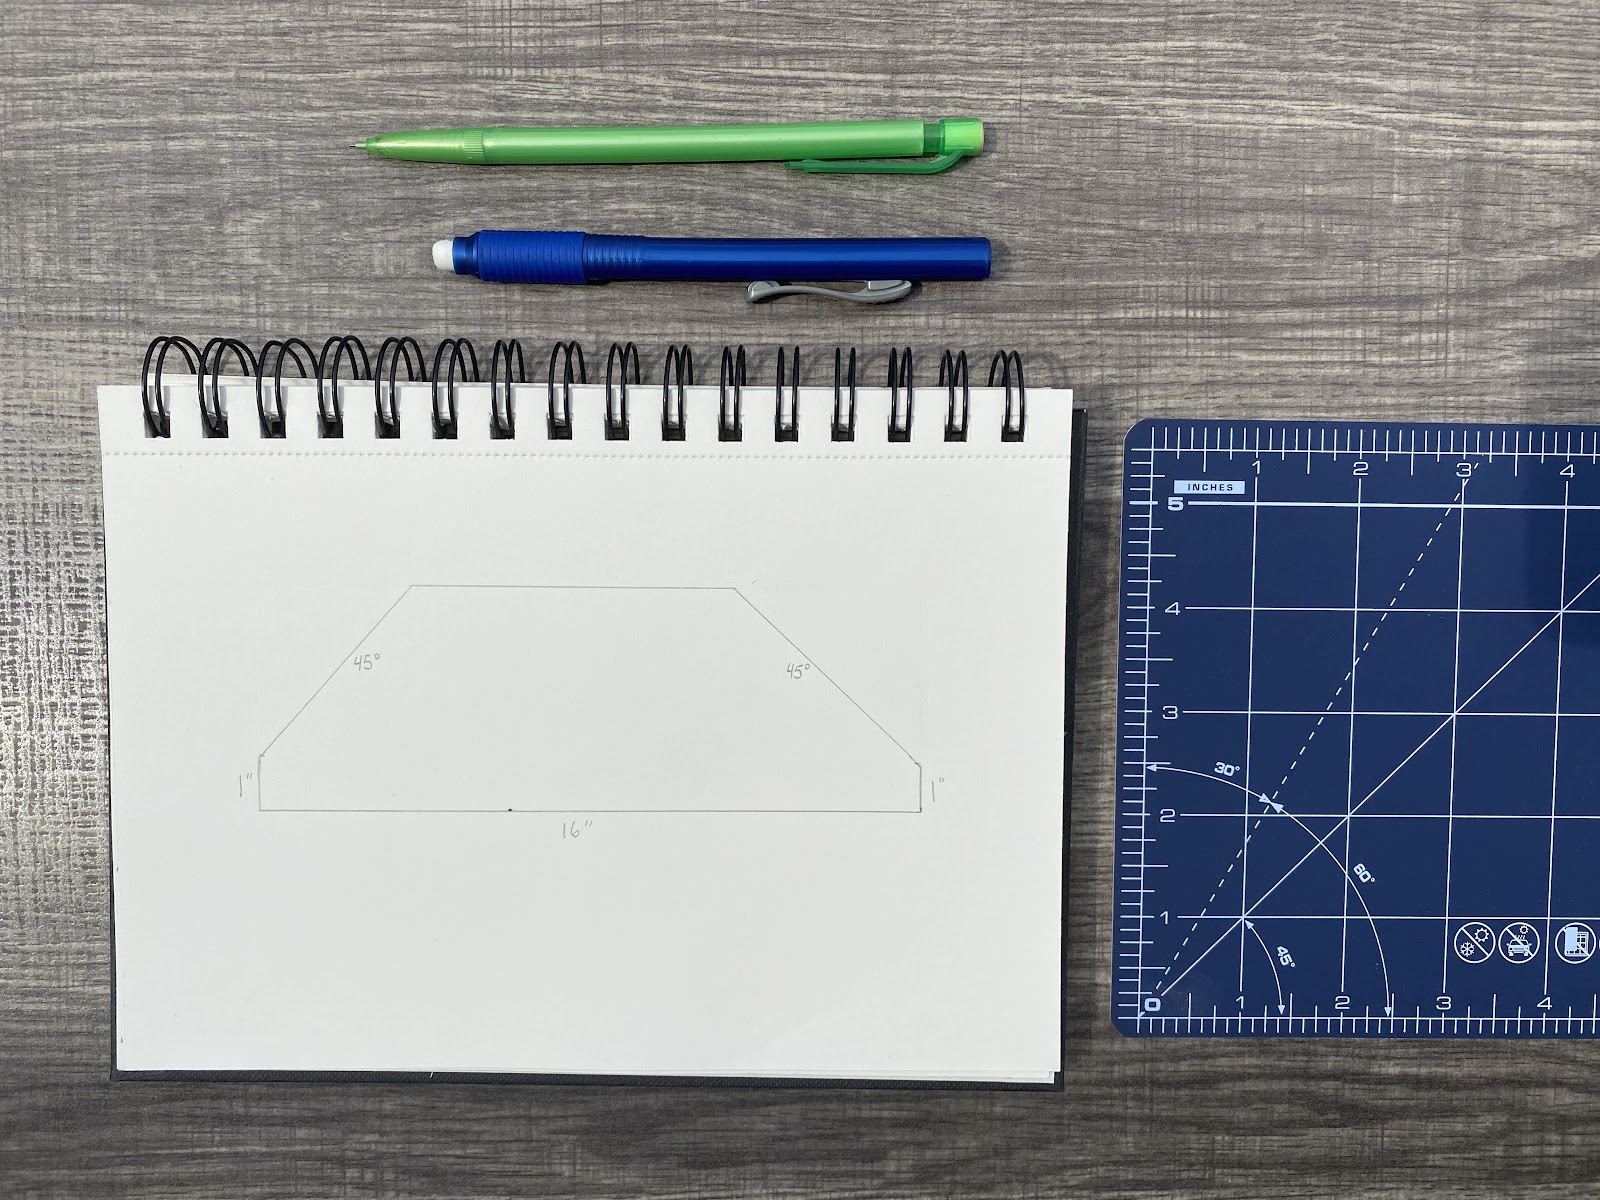
- Optional: To make the feet look a little prettier, you can cut the ends of each board at a 45° angle. Measure from the bottom of the end and make a mark at 1”. Using that mark as a starting point, cut your 45° angle. Below is a drawing to illustrate how it should look.
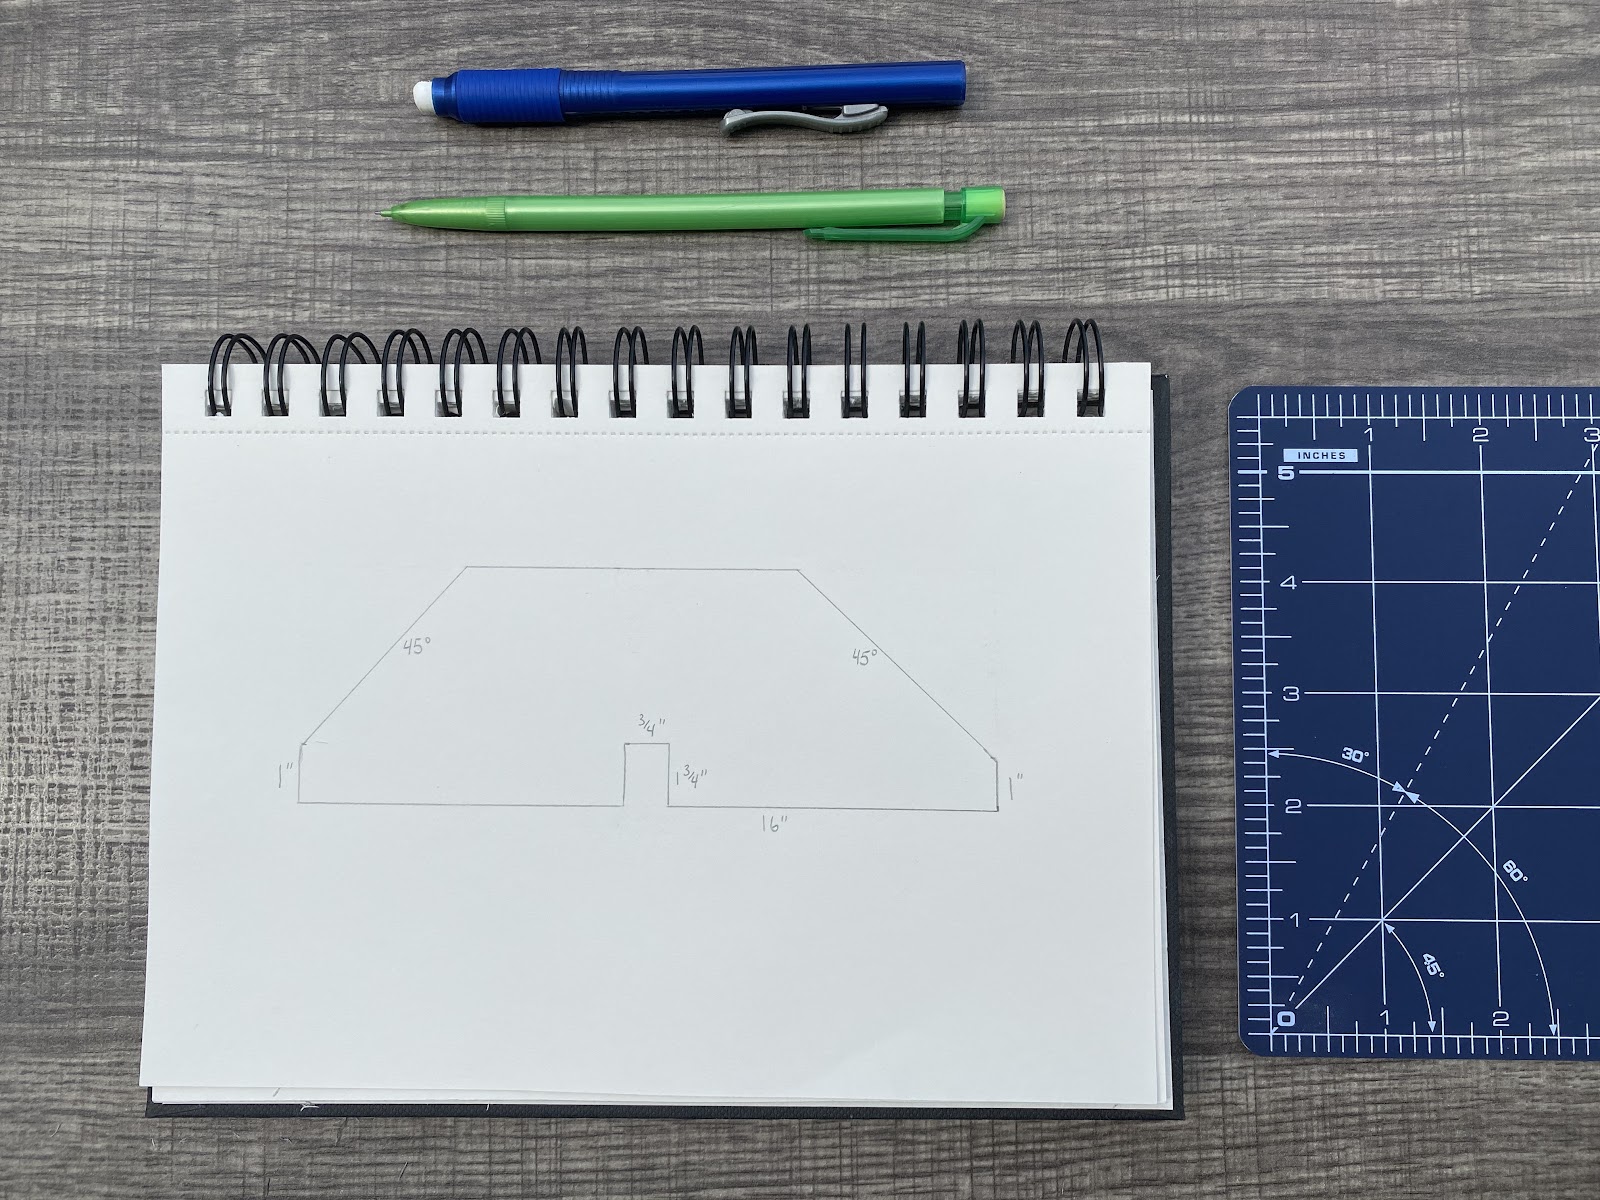
- Using the jigsaw, cut out a ¾”x1 ¾” notch from the top center of four of the footboards. (See below)

- Using the jigsaw, cut out a ¾”x 1 ¾” notch from the bottom center of the remaining 4-foot boards. This will be how the feet lock into each other.
- For each foot, take one of each of the notched tops and notched bottom boards and slide them into place to create a “+” with the boards. You may need to use sandpaper in the notch if it’s a bit too snug for them to fit together. Repeat for the remaining 3 feet.
- From your sheet of plywood or chipboard, cut four 8”x31” pieces. These will be the legs of the frame.
- Next, cut notches into these four plywood pieces. For each leg, cut a notch on one end in the center, measuring 3 ½” deep by 1 ¼” wide. This notch is where the foot locks in.
- On the other end of each leg, cut a notch in the center, measuring 1” deep by 3 ½” wide. This notch will be where your 1”x3”x8’ boards rest.
- Assemble the legs and feet together and space them the distance apart you want them to be. Think of them as legs of a table.
- Rest the 1”x3”x8’ boards in the notches of the legs. Think of the boards at a tabletop.
- Use your clamps to hold your boards together where they meet at each leg point.
- Your quilt frame is ready for you to attach your quilt. Just pull up and a chair and start quilting!
- You can attach your quilt to the frame by tacking the quilt directly into the boards on the quilt perimeter or by using some small plastic clamps and clamping it to the boards.
How To Make A PVC Quilt Frame
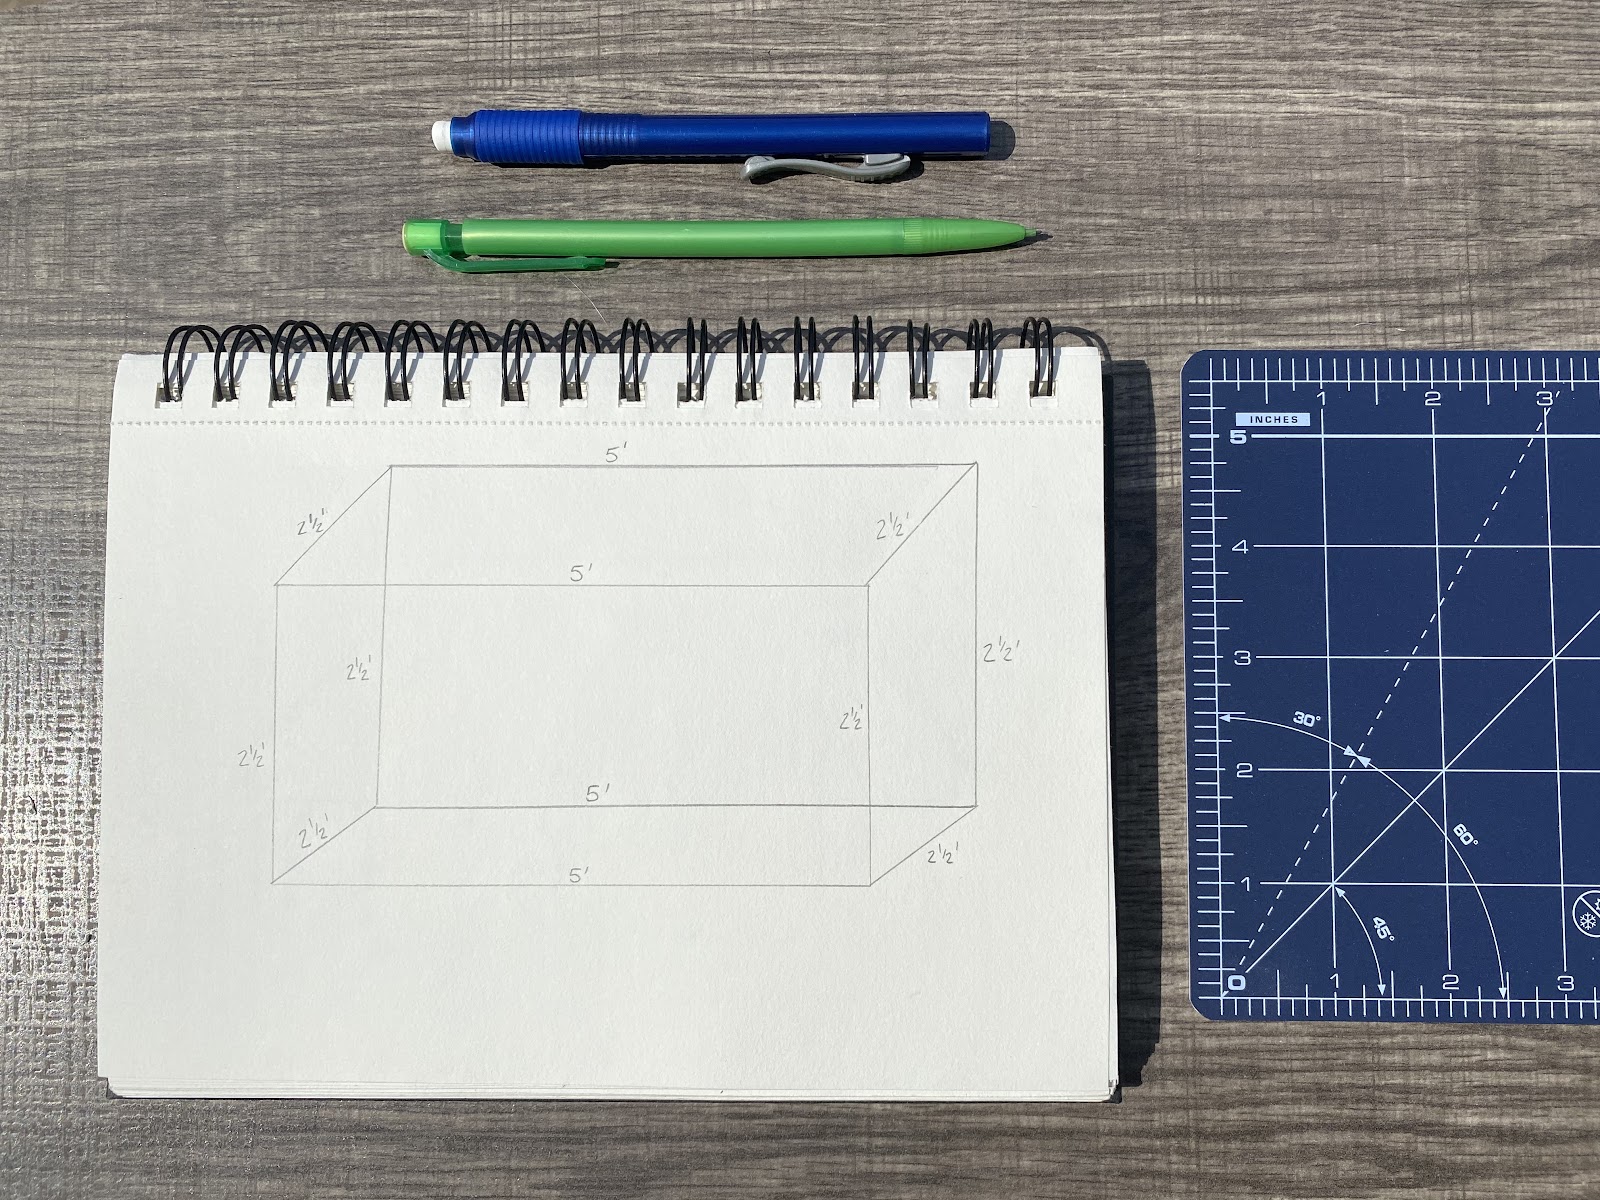
These are instructions to create a 5’x2 ½’ quilt frame. If you choose to create a larger frame, you will need longer pieces of PVC.
Supplies You Will Need:
- Eight 1”x5’ PVC pipes (If your local store only has 10’ pipes, that’s totally fine. Just purchase four 10’ pipes and cut them in half to create 8-5’ pipes.)
- Eight 1” 3-way PVC elbow fittings
- Pipe Snap Clamps (You’ll use these to hold your quilt in place. I suggest purchasing 1” and 1 ¼” clamps, depending on the thickness of your quilt project. Thicker quilts will need a larger clamp.) I suggest purchasing enough so that you can place a clamp on the quilt every 8”-10” to hold it securely.
- Hack saw or pipe cutter
- Sandpaper
Steps to Create a PVC Quilt Frame:
- Cut four of the 5’ PVC pipes in half to make eight 2 ½’ pipes.
- Use the sandpaper to sand down the edges that you cut to make them smooth.
- Ready to assemble:
- Attach two of the 3-way PVC elbows to both ends of all the 5’ pipes.
- Attach the 2 ½’ pipes into the remaining holes of the 3-way elbows to create the PVC pipe box like the image below.
- Place your quilt sandwich over the frame in the area you want to quilt and use the pipe snap clamps to hold your project in place.
Which Quilters’ Frame is Better?
Each frame type is going to have it’s own pros and cons.
Which frame will work for you will depend on how often you plan on using the frame and the size of your project. Let’s go over the pros and cons together, shall we?
Wooden Quilting Frame
Pros:
- Sturdy
- Suitable for larger projects
- Can accommodate the entire quilt.
- Can break down and store easily in the garage or other storage area.
Cons:
- May be too large for smaller projects.
- Will take up a large space when in use.
- Takes some time and skill to build.
PVC Quilting Frame
Pros:
- Lightweight
- Easy assembly/disassembly
- Easy storage
- Great for smaller projects
Cons:
- Can only hold part of your project at a time if you are working on something larger.
- PVC clamps may be a little tricky to work with.
- Small
More Related Articles
15 Beginner Quilt Patterns To Make You Look Like A Pro
Make A Praise-Worthy Cathedral Window Quilt With Our Easy Tutorial
Free 8 Point Star Quilt Pattern and Tutorial
Depending on the types of projects you plan to work on, you could go either way with these two great options for DIY quilting frames. Both assemble and disassemble pretty quickly once you have everything cut and prepped.
A quilting frame is an excellent addition to your quilting toolbox if you plan on investing a lot of time into hand quilting. It’s great that you can pull up a chair and quilt your projects in any room of your home.
I hope this tutorial has given you the confidence to create your own quilting frame, whichever style you choose to make.